Tampilkan postingan dengan label ethnic. Tampilkan semua postingan

Rabu, 07 November 2012

Recipe for Shrimp and Veggie Curry


Here's a recipe for a tasty, quick meal.  I always keep some frozen shrimp in the freezer.  They can be defrosted quickly in a bowl of room temperature water.  Of course, if you have access to freshly caught shrimp, use those. This quick to prepare curry is a little crunchy, a little creamy, with lots of intense flavor, but mild heat.  You can up the heat factor if you're a "hottie".  
Other than making the rice, if serving with the curry, this can be on the table in about 20 minutes. 


Yield: 4 servings
Time: 20 minutes (plus rice)
Ingredients:

  • ½ cup diced red bell pepper
  • ½ cup diced onion
  • 1 cup diced fresh tomatoes (could use canned)
  • 1 TBSP canola oil
  • 2 TBSP mild curry paste (or 3-4 TBSP curry powder)
  • 1 cup coconut milk
  • 20 medium frozen shrimp, peeled, deveined, (defrosted in room temp water rinse or overnight in fridge)
  • 1 cup frozen green peas
  • 2 TBSP coarsely shredded basil plus handful finely diced for serving
  • Juice from ½ a lime plus wedges for serving
  • Salt and pepper if needed
  • Naan or rice for serving

Method:
  • Heat the oil over medium to medium high heat.
  • Add diced pepper, onion, and curry paste (or powder).
  • Cook until veggies are softening, about 5 minutes (turn heat down if browning too much).
  • Add tomatoes, shredded basil, and coconut milk.  Turn heat down to simmer for 10 minutes.
  • Turn heat up to medium.  Add shrimp and peas and cook just until shrimp turn from translucent to pink, 5 minutes or less.
  • Stir in lime juice and taste.  Add salt/pepper if needed (I didn't but it depends on your curry paste/powder and your taste buds).
  • Serve over rice or with naan, garnished with lime wedge and diced basil.

I served this with brown basmati rice that I made earlier in the day and kept warm in the rice cooker. Enjoy!


Kamis, 08 Maret 2012

Recipe for Thai Shrimp and Veggie Curry

The photo doesn't do this meal justice!  I probably should have worked on the composition a bit more and taken a few other shots but after tasting the curry sauce, I was in a hurry to eat!  So, don't hold the poor quality photo against this recipe-it's a keeper.

Time: 30 minutes
Yield: 4 servings

Ingredients:
  • 2 cups cut asparagus spears, 1 inch pieces
  • 2 cups spinach leaves
  • 3 cloves garlic
  • 1 1/2 cup diced onion
  • 1 can coconut milk
  • 1 TBSP fish sauce
  • 2 TBSP fresh lime juice
  • 24 medium shrimp, cleaned, shelled, tails removed and deveined
  • 3 TBSP Thai red curry paste
  • Canola oil
  • Salt
  • Pepper
  • Fresh mint and lime slices for garnish


Method: 
  • Saute onion in oil over medium heat until soft, about 10 minutes.  Add garlic and cook 1 more minute over medium high heat.
  • Add curry paste.
  • Add coconut milk, fish sauce, and lime juice.
  • Bring to boil.  Taste and add salt and pepper to taste.
  • Turn down heat to medium, add asparagus and simmer for 5 minutes.
  • Add spinach and shrimp; simmer until shrimp turns pink and spinach wilts, about 3 minutes.
  • Serve over rice, garnished with chopped mint and lime slices.

This would be good with chicken or beef too.  And seriously, it's "spoon up the left over sauce and slurp it" kind of good!


Senin, 05 Maret 2012

Recipe for Moussaka-Secret Recipe Club


Moussaka-something I love ordering in restaurants but have failed miserably the few times I've tried to make it. Not this time!  Thanks to Evelyne at Cheap Ethnic Eatz, I now have a great recipe.  Evelyne's blog was my March Secret Recipe Club assignment.  It is a nice experience each month to really spend some dedicated time on a fellow bloggers site.  You can read more and see all of this months recipes on the Secret Recipe Club site.

Evelyne has a nice mixture of ethnic recipes on her site so I'd encourage you to go over and check it out.  It was hard to pick just one recipe but I'm really happy I chose her moussaka.  The only real changes I made were using bison instead of lamb or beef (wanted to use lamb but couldn't find any the day I was cooking) and I used a fair bit more cinnamon than called for, only because I love it so much!


Yield: 8 servings
Time: 2 hours


Ingredients:
  • 2 large eggplants
  • salt
  • 1/4 cup olive oil
  • 2 lbs ground bison, lean
  • 2 large onions, diced
  • 2 garlic cloves, smashed and minced
  • 1/2 cup good red wine (I used a pinot noir)
  • 1/4 cup tomato paste
  • 3/4 TBSP ground cinnamon
  • salt and pepper
  • 1/3 cup fresh parsley, chopped
  • 1 cup plain breadcrumbs
  • 1 cup grated aged Parmesan
  • Cooking spray


For the bechamel sauce:
  • 1/4 cup butter
  • 1/3 cup AP flour
  • 4 cups 2% milk
  • 4 eggs, lightly beaten
  • 2 cups 2% cottage cheese
  • 1 tsp freshly ground nutmeg


Method:
  • Slice the eggplants into 1/2 inch slices; lay on paper towels and sprinkle with salt; allow to sit at room temperature for 30 minutes.
  • Heat a few TBSP of oil over med-high heat.
  • Wipe salt off and dry eggplant slices then fry until browned and softening; do in batches adding more oil as needed. Drain on paper towels after each batch.
  • Hold cooked eggplant for assembly of casserole and meanwhile heat remaining oil over medium heat.
  • Add onions and cook until translucent.
  • Add ground bison and cook until no longer pink.
  • Add garlic and cook 1 minute.
  • Add wine, tomato paste, cinnamon, salt and pepper.
  • Bring to a boil and simmer for 15 minutes.
  • Add parsley.
  • Preheat oven to 375 degrees.
  • Spray 9x13 inch baking dish with cooking spray.
  • Sprinkle half the breadcrumbs over the bottom of dish.
  • Layer half the eggplant, then half the meat, then half the Parmesan.
  • Repeat layering, breadcrumbs, eggplant, meat, Parmesan.
  • Make sauce by melting butter over medium heat.
  • Whisk in flour and cook for 1 minute.
  • Pour in milk, whisking continuously until very thick.
  • Remove from heat.
  • Slowly whisk in eggs, cottage cheese and nutmeg.
  • Pour sauce over casserole, smooth top if needed.
  • Bake for 1 hour or until browned.
  • Cool for 10 minutes and serve.


Why was this recipe a keeper?  I think it was a combination of having the eggplant sliced to the right thickness, cooking until browned and softening and then the wonderful bechamel with cottage cheese in it.  The sauce was rich without being too overwhelming.  I think this would be amazing made with ground lamb (and hope I can find some next time!).


This keeps and reheats very nicely.  Thanks Evelyne for sharing this recipe!
Printable recipe

Senin, 19 Desember 2011

Recipe for General Tso's Chicken


Have you found the terribly addicting website "Pinterest"?   If not, I suggest one of two things:  If you're a visual person and have some time every day to dawdle and browse around a really fun website, check it out.  If you're a super busy person who already wastes too much time on-line, stay away!  Seriously though, it is a great place to see all sorts of things from food and recipes, to ideas for decorating, funny pictures and sayings and so much more.  I found the inspiration for this recipe there.

Yield: 4 servings
Time: 45 minutes


Ingredients:

  • 1 pound boneless, skinless chicken breasts, cut into bite sized chunks
  • 1 1/2 cups cornstarch
  • 1/2 tsp salt
  • 1/2 tsp freshly ground black pepper
  • 1 cup peanut oil, plus 1 tsp
  • 1/4 tsp dried red chili flakes
  • 2 cloves garlic, minced
  • 1 tsp white sesame seeds, for garnish
  • 1 scallion, green parts thinly sliced, for garnish

Marinade

  • 1 TBSP soy sauce
  • 1TBSP sherry
  • 2 egg whites

Sauce

  • 1/4 cup chicken stock
  • 1 1/2 TBSP tomato paste
  • TBSP soy sauce
  • TBSP rice vinegar
  • 1 tsp hoisin sauce
  • 1 tsp chili paste
  • 1 tsp sesame oil
  • 1 tsp cornstarch

Method:
  • Mix the marinade ingredients together and marinade chicken for 15 minutes.
  • Mix the sauce ingredients together and set aside.
  • Heat 1 cup of peanut oil in a hot wok over med-high heat.
  • While oil heats, drain chicken from marinade and toss in cornstarch to coat.  Shake excess cornstarch off and add chicken in batches to hot oil in wok.
  • Cook chicken until well browned and cooked through, about 4 minutes.
  • Remove chicken-drain on paper towels, and discard oil.  Wipe wok out with paper towels.
  • Add 1 tsp peanut oil, garlic and red pepper flakes to hot wok and stir fry for 30 seconds until fragrant but don't burn garlic.
  • Add in sauce (stir first if cornstarch has settled) and stir fry for 1-2 minutes until thickening.
  • Add chicken to wok and cook until well coated and warmed through.
  • Garnish with scallions and sesame seeds.

We don't have any really good Chinese restaurant here (I know this probably isn't authentic Chinese but...) so I was happy to find a relatively easy recipe reminiscent of good Chinese restaurant food.  Do you cook "Chinese" at home?


Printable recipe
Original Recipe

Rabu, 14 Desember 2011

Recipe for Char Sui Bao - Daring Cooks


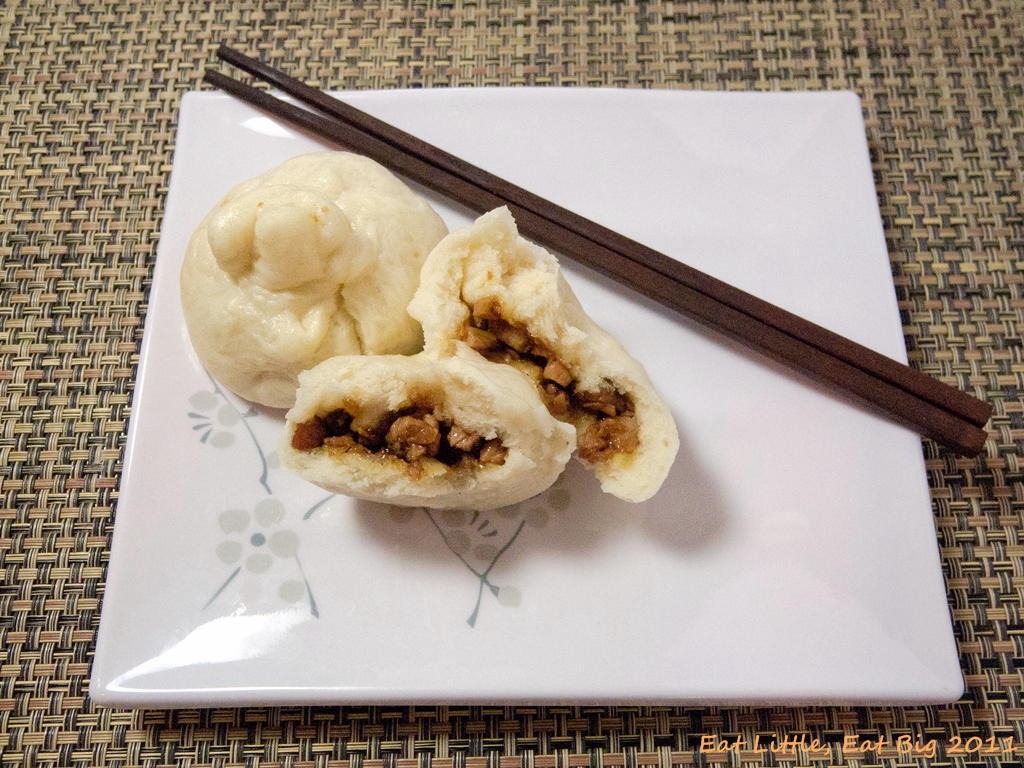
Do you love dim sum?  We do and always try to go to our favorite dim sum restaurant when we get back to San Francisco (Yank Sing-a top 100 SF Restaurant in 2011).  They call it deem sum...they probably know better than I do, but I've always seen it written as dim sum, except on their website.  Anyone know the correct spelling?  Anyway, I digress.  I love the steamed pork buns-Char Sui Bao-but never gave a thought to trying to prepare them at home.


Turns out they are a challenge to make, but not an insurmountable one.  That's why I really enjoy participating in The Daring Kitchen challenges.  The challenges so far have pushed me in to culinary experiences I wouldn't have picked on my own and are presented with very detailed instructions, priming the pathway to success.  Our Daring Cooks’ December 2011 hostess is Sara from BellyRumbles! Sara chose awesome Char Sui Bao as our challenge, where we made the buns, Char Sui, and filling from scratch – delicious!


Pork for the filling
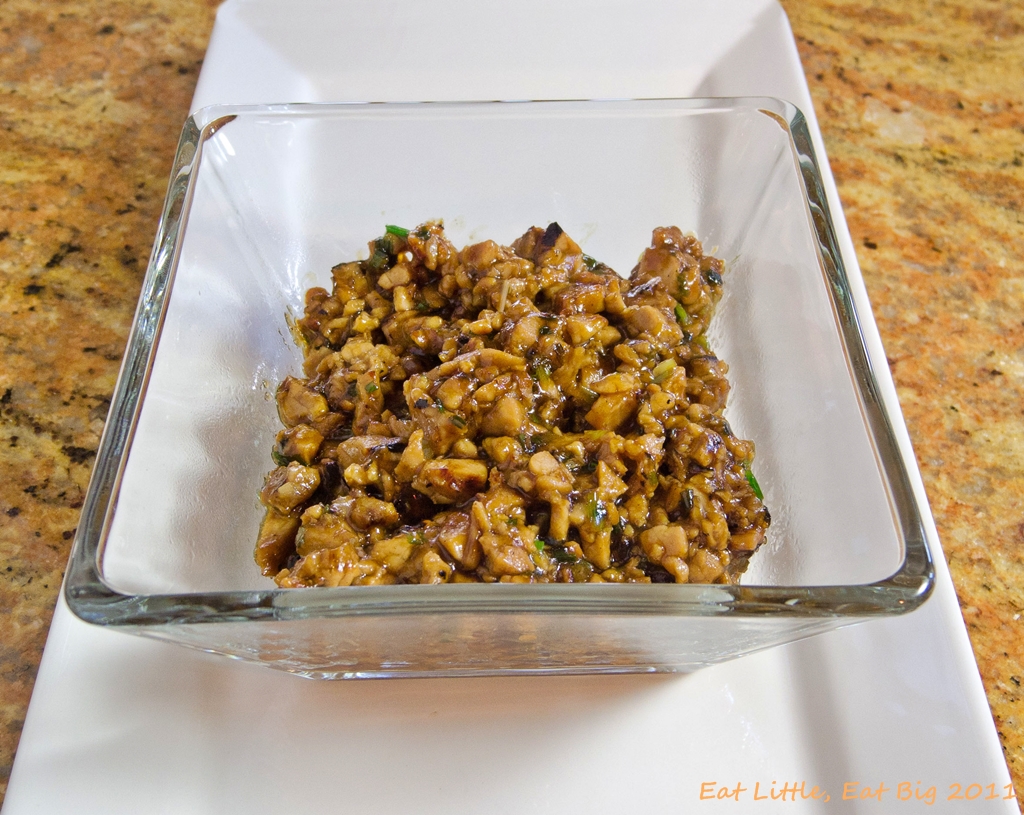
Filling for the buns
Three stages of buns:  front-dough balls after rising; middle-dough patted out; back-filled buns
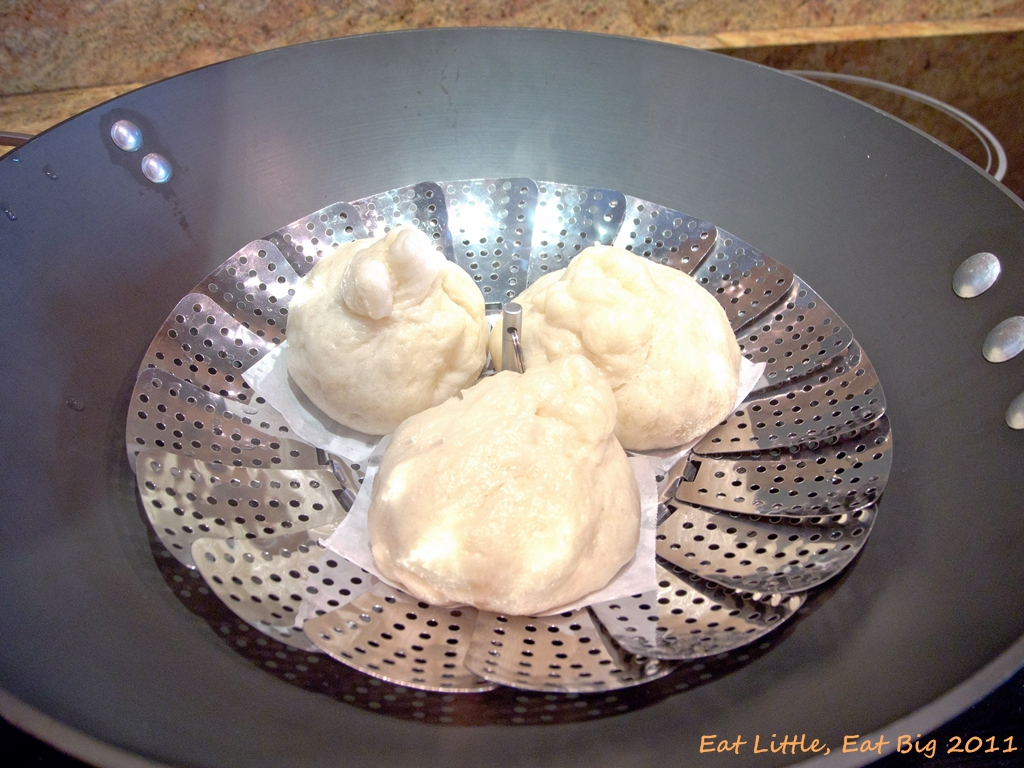
Buns ready for steaming
Before I go any further I will admit that one area of this challenge that I didn't feel much success in was the bun making.  They tasted great but are sort of ugly-Char Sui Bow Wow.  I did try. I even watched some U-Tube videos but, meh, just not pretty.  Now, this lady-she knows how to make buns!


Yield: 20 buns
Time: 3+ hours including rising time for the buns; does not include overnight marinading time for the pork


Ingredients:
Char Sui (pork)

  • 1 pork tenderloin (1-1.5 lbs)
  • 4 large cloves of garlic, crushed
  • 1 tsp grated ginger
  • 1 TBSP peanut oil
  • 3 TBSP honey
  • 2 TBSP hoisin sauce
  • 2 TBSP soy sauce
  • 2 TBSP oyster sauce
  • 1 TBSP sherry
  • 1 tsp Chinese five spice powder
  • 1 TBSP sesame oil


Pork filling
  • 12 oz char sui, finely diced
  • 2 green onions, finely diced
  • 2 TBSP soy sauce
  • 3 TBSP oyster sauce
  • 1 TBSP sesame oil
  • 1/3 cup chicken stock
  • 1 1/2 tsp cornstarch
  • 1 TBSP vegetable oil


(The original recipe was for 1 TBSP soy sauce, 2 TBSP oyster sauce, 1/4 cup chicken stock and 1 tsp cornstarch but I felt the filling was too dry so I added additional quantities as per the list above)


Bun Ingredients
  • 1 1/2 cup of milk, scalded
  • 1/4 cup sugar
  • 1 TBSP vegetable oil
  • 1/4 tsp salt
  • 2 1/2 tsp dried yeast
  • 3 cups plain flour
  • Parchment paper
  • Steamer (original recipe called for bamboo but I used metal in my wok)


(The original recipe called for 1 cup of milk but my dough would not come together so I added another 1/2 cup as per the list above)

Method:
Char Sui (Pork)
  • Trim tenderloin of fat and silver skin.
  • Cut into 4-5 equal pieces.
  • Mix remaining ingredients together.  Reserve 1/3 of mixture-place in fridge.
  • Marinate pork in remaining mixture overnight or at least 4 hours.
  • When ready to cook, preheat grill to med-high and clean and oil grates.
  • While grill heats, remove pork from marinade and pat excess marinade off with paper towels. 
  • Remove reserved marinade from fridge.
  • Grill for 2 minutes each side to get a slight char and then reduce heat to medium, baste with reserved marinade.
  • Grill for an additional 10-12 minutes until center is just barely still pink.
  • Remove and rest/cool while preparing dough and filling.


Pork filling

  • Heat vegetable oil in skillet over med-high heat.
  • Saute the green onion for 2 minutes until soft.
  • Add diced char sui and stir to combine.
  • Add oyster sauce, soy sauce, and sesame oil; cooking stirring constantly for one minute.
  • Mix cornstarch and stock together and add to the meat mixture, stirring well until mixture thickens, about 1-2 minutes.
  • Remove from pan and allow to cool.


Buns
  • Stir sugar, oil and salt in to scalded milk and allow to cool to lukewarm.
  • Once cooled, add yeast.  Set aside until frothy, about 10 minutes.
  • While yeast develops, sift flour into a large bowl then add milk/yeast mixture.
  • Mix together briefly with hands and turn out on to a lightly floured surface and knead for 10 minutes, until dough is smooth and elastic.
  • Place dough in lightly oiled bowl and cover with damp cloth.
  • Let dough rise until doubled (1-2 hours).
  • Punch dough down and divide in to 20 equal pieces.
  • Roll or press with hands each piece in to 2-3 inch circles.
  • Drop 1 TBSP of cooled filling in center of a dough circle, gather the edges together and twist to seal. Repeat with all dough pieces.
  • Cover and let rise for 15 minutes.
  • Place each bun on a piece of parchment paper slightly larger than bun (buns will enlarge as steamed) and place a few at a time in steamer over boiling water in wok (don't crowd them).
  • Cover wok and steam for 12 minutes.
  • Serve warm.  They keep well in fridge and freezer.  To reheat thawed buns, steam for 5 minutes (or as Mr. ELEB did-nuke in microwave for 15 seconds).

The filling is delightful and the buns have just the right hint of sweetness and a good texture.  Even though they were ugly when I made them, the steaming sort of softened everything up so they didn't look so bad. Once we bit into them, we didn't really care what they looked like!  Do you like dim (deem) sum?


Printable recipe

Minggu, 27 November 2011

Recipe for Sans Rival Cake - Daring Bakers


On Friday, I spoke of everything in moderation and trying to eat healthy most of the time.  Well, I'm sure you can appreciate that this lovely cake fits in the "occasional treat" category here at Eat Little, Eat Big.  Last month I joined an adventuresome group of bloggers who try monthly challenges to expand our culinary aperture and to get out of our comfort zone.  Catherine of Munchie Musings was our November Daring Bakers’ host and she challenged us to make a traditional Filipino dessert – the delicious Sans Rival cake!

This cake is based on what I perceive to be fairly traditional French pastry principles:  layers of dacquoise (nut meringues) held together with a decadent butter cream frosting.  Using a sharp serrated knife, I sliced the Sans Rival into very thin slices, getting about 24 slices from the cake.  I wrapped each in wax paper and then froze in a freezer bag.   We enjoyed a piece of cake when it was made and then another one later in the week.  I took some pieces to a dinner party where it was well received.   It freezes very well and I'm patting myself on the back here that we didn't eat it all over the course of a couple of days!
Two of the four dacquoise layers


Building the cake

Finished Sans Rival Cake
Catherine gave us options for the cake (adding in cocoa for a chocolate version) but I went with the traditional cashew dacquoise and vanilla flavored butter cream frosting.  I do think chocolate meringues with hazelnut or mocha flavored icing would be awesome.  At the dinner party, we were wondering if you could use Nutella!?

Yield: 12-24 slices (depending on how you slice it)
Time: About 2-3 hours (I used disposable 9" cake tins so I could cook all the layers at once)

Ingredients:
Dacquoise
  • 10 large egg whites, room temp
  • 1 cup white granulated sugar
  • 1 teaspoon cream of tartar
  • 2 cups chopped, toasted cashews (divided)
  • Parchment paper, butter and flour for pan(s)


Butter cream frosting
  • 5 large egg yolks, room temperature
  • 1 cup white granulated sugar
  • 1/4 cup water
  • 1¼ cup (2½ sticks) unsalted butter, room temperature
  • 1½ teaspoon vanilla extract (I would add another 1/2 tsp next time)
  • Raspberries for decorating (optional)

Method:
Dacquoise
Note: You will need four layers which, depending on how many pans you have, you may have to bake in batches. Be sure to use fresh parchment paper and cooled pans for each batch or use disposable pans as I did (still with parchment paper and butter/flour).
  • Preheat oven to 325°F.
  • Line cake pan bottoms with parchment paper and butter and flour the sides really well.
  • In a large clean, dry glass or metal mixing bowl, beat egg whites on medium until foamy (2 mins.). 
  • Sprinkle with cream of tartar. Gradually add sugar, a couple of tablespoons at a time, continuing to beat now at high speed until stiff shiny peaks form.  (about 7-10 mins.)
  • Fold in 1 1/2 cup of the nuts, reserving the remainder to use for decoration.
  • Divide meringue into four equal parts. Spread in pans, evenly to edges. 
  • Bake in preheated oven for 30 minutes, or until golden brown. Remove the meringue from the baking pans while still hot; allow to cool slightly. Peel off the parchment paper while it is still warm.
  • When cool, trim edges so that all 4 meringue layers are uniformly shaped (serrated knife works best).


Butter cream frosting
  • Beat egg yolks at high speed until the yolks have doubled in volume and are a lemon yellow.
  • While yolks are beating, put the sugar and water in a heavy pan and cook over medium heat, stirring the sides down until all the sugar is dissolved and the syrup reaches 235°F on a candy thermometer (or thread stage).
  • With the mixer on high, very slowly pour the syrup down the sides of the bowl into the egg yolks.  Continue beating on high until the mixture is ROOM TEMPERATURE (about 15 mins). 
  • Still on high, beat in the soft, room temperature butter a tablespoon at a time. 
  • Add flavoring after you beat in the butter.
  • Refrigerate the buttercream for at least an hour, and whip it smooth just before you use it.


Assembly
  • Set bottom meringue on serving plate with a dab of butter cream to hold it in place. 
  • Spread a thin layer of butter cream and then place another meringue on top. Repeat with a thin layer of butter cream, meringue, thin layer of butter cream, meringue, and finally butter cream the top and sides. 
  • Decorate with reserved nuts and raspberries (if using).
  • Store in fridge.  
  • To freeze, slice into thin pieces, wrap in wax paper and then place in freezer bag.  Stays fresh at least 2 weeks.  Remove from freezer to come to room temp prior to serving.
I really enjoyed this challenge.  If you are interested in more information about the Daring Kitchen challenges, here is the website.


Jumat, 25 November 2011

Recipe for Greek Chicken with Tzatziki-Win a Trip to Greece!


I hope that photo makes your mouth water...mine is and it is only 8 am here as I'm typing this!  Of course, if you are still stuffed from Thanksgiving and really can't think about food, just save this and check it out later! 


If you look up at the top of the page, you'll see the statement about what my blog is all about:  "Celebrating the delights of good healthy food and special treats! Sharing recipes, information and experiences."  That pretty much sums up my and Mr. ELEB's philosophy on good living and living a healthy life.  Everything in moderation.  Most of the time we eat healthy.  He runs, I bike.  We moved to Maui so we could enjoy the outdoors every day of the year.


And, part of good living is enjoying a splurge now and then...like this weekend that we enjoyed at the Kapalua Food and Wine Festival or this chocolate torte.  But most of the time, we try to stick to the healthier side of life.


Today's recipe fits in the "good healthy food" category and, always a bonus, it tastes fantastic!  


Yield: 6 servings
Time: 60 minutes including marinade time


Ingredients:

  • 1 1/2 lbs. boneless, skinless chicken breast, cut into large chunks
  • 1/3 cup coconut (or olive) oil
  • freshly squeezed juice of 2 lemons (about 1/4 cup, reserve 1 TBSP)
  • 2 tsp vinegar (red wine, rice, champagne etc)
  • 2 tsp dried oregano
  • 2 tsp dried thyme
  • 1 TBSP dried organic no salt seasoning (I use Kirkland brand-mix of 21 spices and other ingredients including onion, garlic, pepper, parsley, mustard seed, coriander, rosemary, cayenne pepper...)
  • 1 cup Fage plain non-fat Greek yogurt
  • 1 cup grated cucumber, squeezed dry in paper towels
  • 2 tsp fresh chopped dill weed
  • 1 tsp minced garlic
  • Salt and pepper

Method:

  • Mix the oil, juice-reserving 1 TBSP, vinegar, and seasonings together and marinate the chicken for 30 minutes (I find any longer than that changes the texture of the chicken and we don't like it as much)
  • While the chicken marinates, mix the remaining ingredients together for the tzatziki including the 1 TBSP reserved lemon juice-adding salt and pepper to taste-and refrigerate until ready to serve.
  • Preheat oven to 375 degrees.
  • Remove chicken from marinade and pat excess marinade off with paper towels.
  • Bake for 15 minutes on a rack over a baking pan (see technique here).
  • Serve with tzatziki and Greek Salad.


Tender, flavorful chicken with a tangy yogurt sauce.  Mmmmm.  Add the Greek salad for a filling healthy meal.


As part of the Foodbuzz Featured Publisher program, I have been entered for the chance to win a trip to Greece courtesy of FAGE. You too can enter to win one of three trips to Greece by entering the FAGE Plain Extraordinary Greek Getaway here: http://www.fageusa.com/community/fage-greek-getaway


Printable recipe
Recipe inspiration adapted slightly from Katherine Martinelli's blog

Jumat, 28 Oktober 2011

Recipe for Light Version of King Ranch Casserole


Maybe this should be called "Princess Ranch Casserole" because it is probably less than half the fat and calories of the classic recipe.  No canned soups, full fat milk, or sour cream, and a modest amount of low fat cheese.  Still delicious though!

If you like Mexican Lasagna I think you'll like this recipe.  It is full of smoky cumin/chipotle heat (on the top edge of my weenie tolerance level so adjust the seasonings accordingly) with a creamy, rich sauce-all for just under 300 calories per serving.  The crunchy bell pepper is a nice complement to the mouth-feel of the sauce.


I adjusted the already lightened up inspiration recipe by using white whole wheat flour, added lime juice, switched in chipotle powder for chili powder, used whole grain wraps instead of corn tortillas, and cooked the chicken and veggies together rather than using pre-cooked chicken.   If you are short on time, using pre-cooked chicken would help, but don't let the long list of ingredients put you off, it really comes together pretty quickly.  Just have all your ingredients ready before you start the roux.
Completed roux
Out of the oven

Yield: 4 servings
Time: 40 minutes

Ingredients:
  • 1 1/2 cups reduced-sodium chicken broth
  • 1 cup nonfat milk
  • 1/2 cup white whole wheat flour
  • 1/2 cup nonfat plain yogurt
  • 1 14-ounce can diced tomatoes, drained
  • 1 4-ounce can chopped green chiles, drained
  • Juice of 1 lime
  • 1 tsp chipotle chili powder
  • 1 tsp dried oregano
  • 1 tsp ground smoked cumin
  • Salt and pepper to taste
  • 1 TBSP canola oil
  • 1 large onion, chopped
  • 1 red bell pepper, diced
  • 2 cloves garlic, minced
  • 2 cups diced skinless chicken breast
  • 2 large whole- or multi-grain wraps, cut into wedges
  • 3/4 cup shredded reduced-fat Cheddar cheese


Method:
  • Preheat oven to 375°F.
  • While broth comes to a simmer in a medium saucepan, whisk together the milk and flour in a small bowl until smooth. 
  • Add the flour mixture to the broth and cook over medium heat, whisking frequently, for about 2-3 minutes (until thickened and smooth).
  • Remove the pan from the heat and stir in yogurt, tomatoes, chiles, lime, chipotle powder, oregano and cumin. 
  • Taste and season with salt and pepper as needed.
  • Heat oil in a skillet over medium-high heat. Add onion, bell pepper, garlic, and chicken; cook, stirring occasionally, until chicken is cooked, about 4-5 minutes.
  • Line the bottom of a 3-quart baking dish with half the wrap wedges. Layer with half the chicken mixture, then half of the sauce. Repeat with remaining wrap wedges, chicken mixture and sauce. 
  • Sprinkle with Cheddar. 
  • Bake until bubbly, 20 to 25 minutes.

For the wraps, I used La Tortilla Factory Whole Grain Smart and Delicious Soft Wraps-I love them for their flavor, texture and 12 grams of fiber (unsponsored endorsement!).  Serve this with a side salad for a filling and satisfying meal.


Printable recipe

Senin, 12 September 2011

Recipe for Lamb and Sweet Potato Curry


According to Wikipedia, curry is a dish of meat and vegetables, cooked in an Indian style spicy sauce and served with rice.  And while not what I think of when I think "curry", other than the rice, this full-of-flavor dish meets the definition.  I adapted this dish from Meena's blog "Hooked on Heat", a great spot for Indian recipes that anyone can tackle.  As you know if you've been reading ELEB for a while, I'm trying to cook more Indian recipes.  This one is a winner!

You have to be somewhat committed to cooking Indian flavored food to tackle this recipe.  It has quite a few spice ingredients.  As it turned out, I had all of them in my cupboard and I would encourage you to suck it up go ahead and stock your spice shelf with these flavorful spices. You'll be all ready to whip together a batch of chai concentrate or another Indian dish.  And trust me, when you taste this one, you'll be glad you did. In addition to a great meal, your kitchen will smell amazing.


Whole spices


Recipe for Lamb and Sweet Potato Curry

Yield: 4 servings
Time: 60 minutes

Ingredients: 
  • 2 TBSP canola oil

  • 5 whole cloves

  • 5 whole cardamom pods

  • 1 cinnamon stick

  • 1 tsp cumin seeds

  • 1 large onion, sliced

  • 1/2 tsp chili powder

  • 1 TBSP coriander powder

  • 1 tsp roasted cumin powder

  • 1/2 tsp garam masala powder

  • 1 TBSP ginger-garlic sauce

  • 2 medium tomatoes, finely chopped, about 2 cups

  • 1 lb ground lamb

  • 1 large sweet potato, cubed, about 3 cups

  • 1 cup water

  • 4 cups baby spinach, washed and dried

  • salt, to taste


Method:
  • Sauté cloves, cardamom pods, cinnamon stick, and cumin seeds with onions in hot oil over medium high heat until lightly browned.

  • Add in tomatoes, ginger-garlic sauce and remaining spices, and cook over medium heat for 5 minutes until tomatoes soften and begin to break down.

  • Crumble in lamb and cook until most of pink is gone, about 5 minutes.

  • Add in sweet potatoes and cook covered for 20 minutes over medium-low heat until potatoes are cooked through.

  • Stir in spinach and cook uncovered until wilted, about 3-4 minutes

  • Taste and season with salt as needed.


Ready to add tomatoes


Ready to add potatoes


Ready to add spinach

I wasn't sure whether to leave the cloves and cardamom pods in the finished dish.  I decided to fish them out, not that it would have been bad to eat one but...


So, thanks to Meena for an inspiring recipe.  I hope you'll give it a try.


What ethnic dishes are you cooking these days?


Printable Recipe